Coupons in LatePoint help you offer discounts to your customers. They can attract new clients and reward regular ones. For example, you can create a coupon that gives first-time customers 20% off their booking.
This is useful for promoting your services and getting more bookings. It also helps with customer loyalty by giving discounts for repeat visits.
The new LatePoint UI makes it simple to manage and edit your coupons.
You can now set specific timeframes for your promotions, and instead of using IDs, you can simply select services, agents, or customers from a list.
In this article, you’ll learn how to create and manage coupons easily using LatePoint’s coupon management features. Let’s get started!
Creating A New Coupon
To create a coupon in your LatePoint dashboard:
- Go to “LatePoint” > “Coupons”.
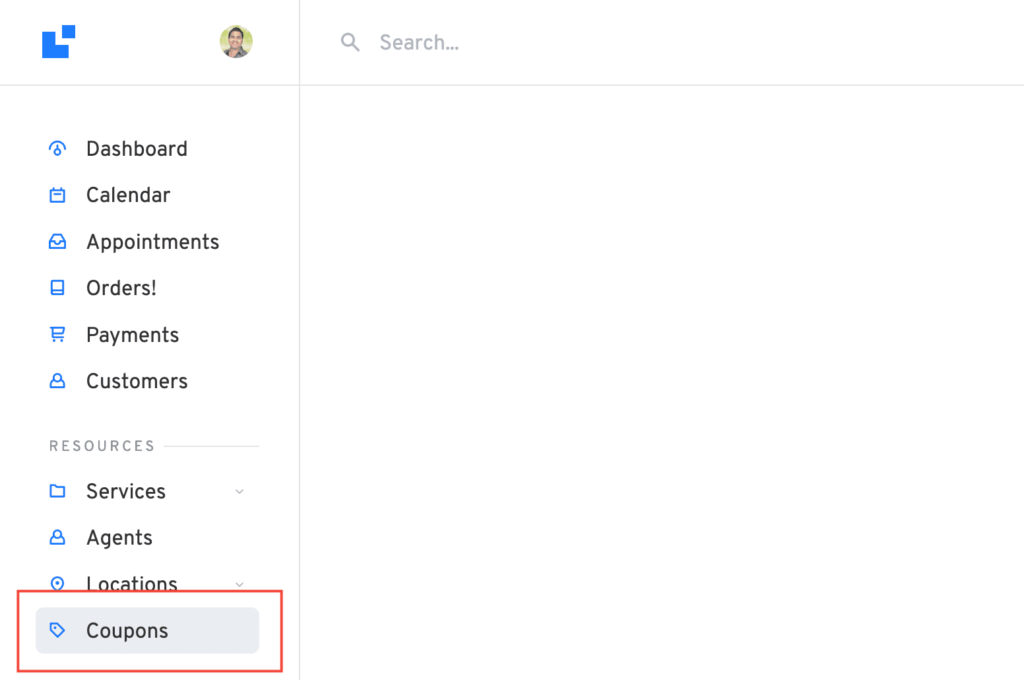
- Here, click on the “New Coupon” button.
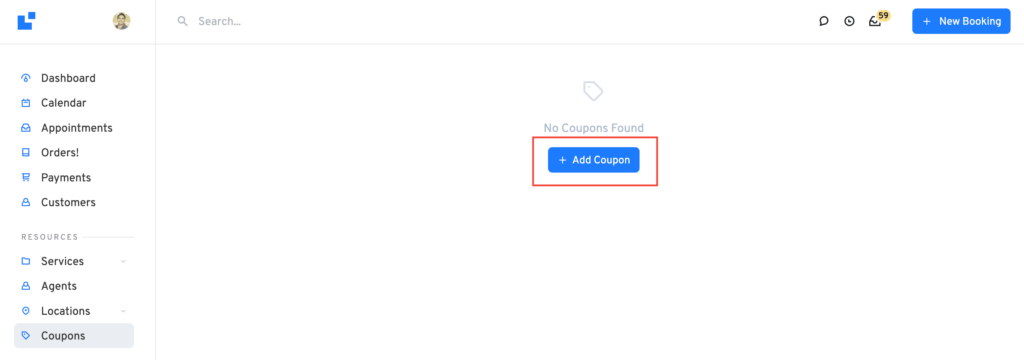
A new form will appear where you can customize your newly created coupon.
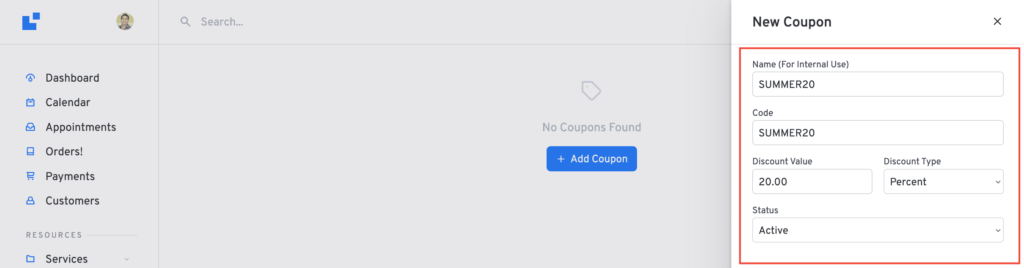
Customizing Your Coupon
Now that you’ve created a new coupon, it’s time to customize it according to business requirements:
- Name (For Internal Use): This is the internal name for your reference and won’t be visible to customers. For example, “Summer Discount” or “New Customer Promo”.
- Code: The code your customers will enter at checkout, such as “SUMMER20” or “WELCOME10.”
- Discount Value: Enter the amount of discount you want to offer.
- Discount Type: You can choose between “Percent” (e.g., 20%) or “Fixed Amount” (e.g., $10).
- Status: Finally, you can mark the coupon as “Active” if you want it to be available right away, or leave it disabled to use later.
Setting Time Restrictions on Coupons
If your coupon is for a specific event or season, you can set start and end dates easily:
- Active From: Choose when the coupon becomes valid.
- Active To: Set the date and time when the coupon will expire.
The format for the dates can be changed on the LatePoint > Settings page, for example: if you set the date format as mm/dd/yy. If you’re running a “Holiday Special” coupon from December 1 to December 31, 2025, you would set the dates as: 12/01/25 to 12/31/25.
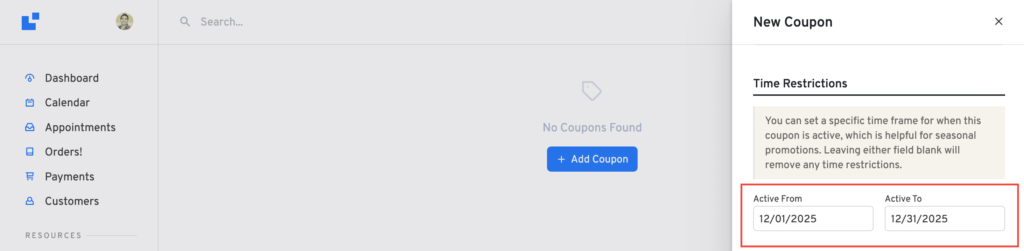
Note: If you don’t set any time restrictions, the coupon will be available indefinitely.
Limiting Coupons to Specific Services, Agents, or Customers
You can control who can use your coupon by setting restrictions on services, agents, customers, or bundles. This helps you target specific groups for your promotions.
- Services: Choose the specific services the coupon will apply to, like “Haircut” or “Massage.”
- Agents: Select which staff members (agents) this coupon can be used with.
- Customers: Restrict the coupon to specific customers. This is useful for loyalty programs or personalized offers.
- Bundles: Choose the specific bundless the coupon will apply to.
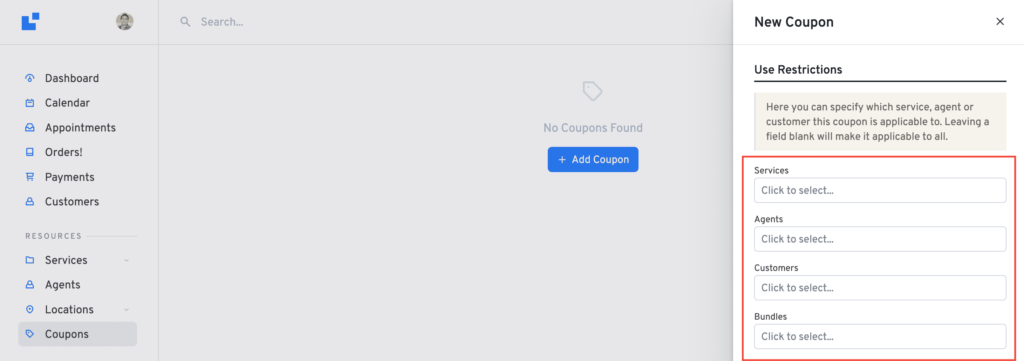
For example, you can offer a coupon that only applies to a particular service or a discount exclusive to a VIP customer.
Note: If you leave these fields blank, the coupon will apply to all services, agents, customers, and bundles.
Setting Usage Limits On Your Coupons
You can set limits on how often a coupon can be used. This helps prevent overuse and ensures that the promotion is controlled.
- Per Customer: Limit how many times each customer can use the coupon.
- Per Order: Set how many times the coupon can be applied within a single order.
- Total: Restrict the total number of times the coupon can be used by all customers.
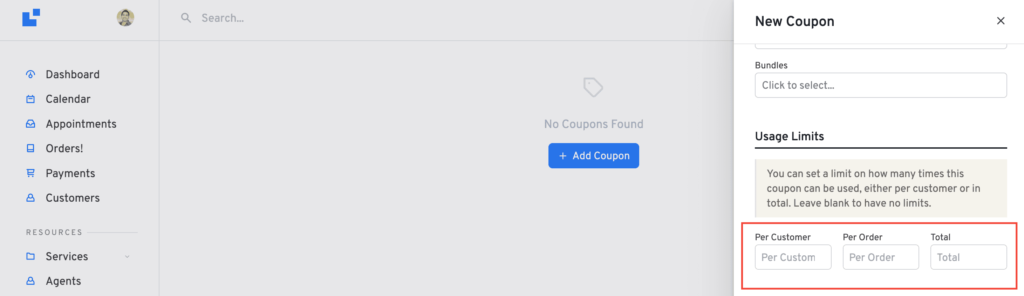
These options are helpful when you want to avoid customers using the same coupon multiple times or when running a limited promotion.
Set Minimum and Maximum Booking Requirements For Coupons
Setting order requirements helps you target specific customer groups based on their booking history.
- Minimum Orders: You can require customers to have made a certain number of bookings before they can use the coupon. For example, if you set the minimum to 3, only customers who have made at least 3 bookings can use the coupon. This is a good way to reward regular customers.
- Maximum Orders: You can also set a limit on how many bookings a customer can have to still qualify for the coupon. For example, if you set the maximum to 5, only customers with 5 or fewer bookings can use the coupon. This helps target newer customers or those who haven’t booked many times yet.
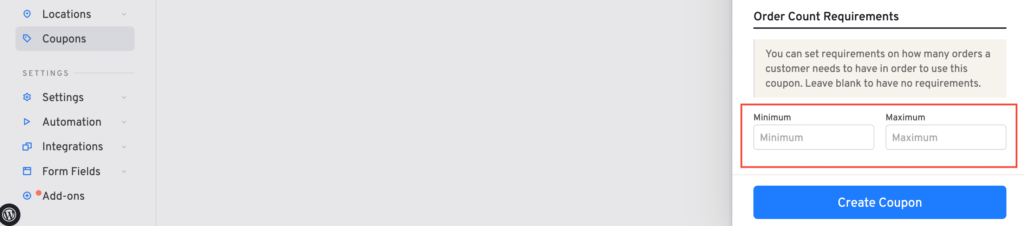
These settings allow you to focus your promotion on repeat customers or limit the offer to newer customers.
Once done, you can click on the “Create Coupon” button to make it active.
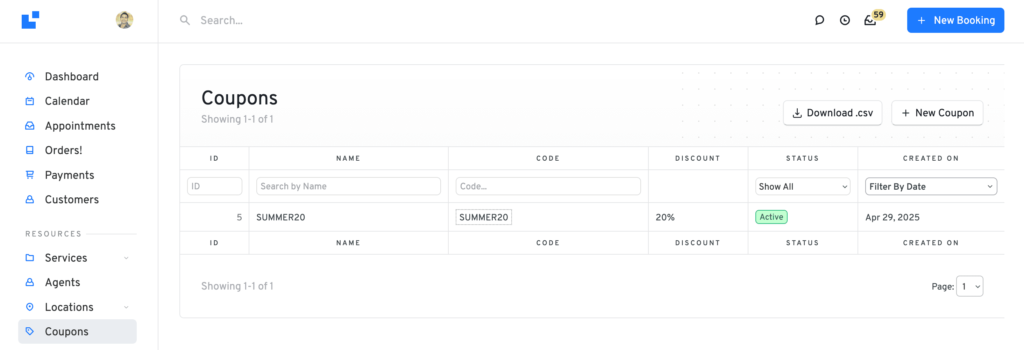
A new row will appear on the “Coupons” tab. You can always click on it to update your coupon details.
That’s all! If you have any other questions, feel free to contact us. We’re always here to help.